Tuesday, July 17, 2018

How to Install and debug an app over the network from xcode.

Step 1: Connect iPhone device with wire and open xCode (only works with xCode 10 and above).


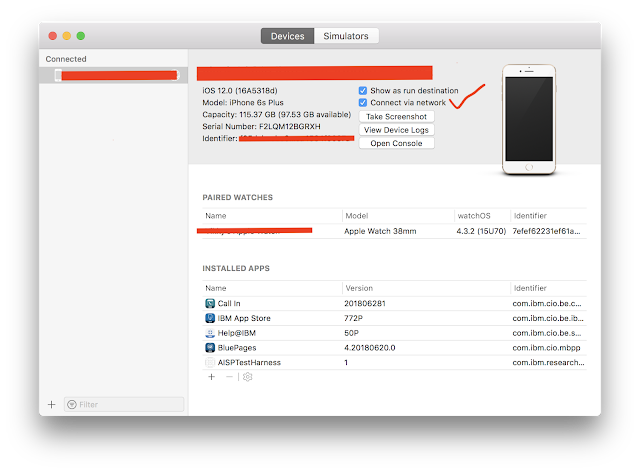
Step 2: Go to "Window > Devices & Simulators", Select the connected device and check "Connect via network".
 

Step 3: Now disconnect and still you will see the device in target device list, Select the device and just RUN.

and it's done.... :)

Monday, September 29, 2014

iOS Developer opening @ IBM Research Lab, Bangalore, India

Great news guys !! We are looking for skilled iOS developers with 2+ years experience for my team in IBM India Research Lab, Dehli/Bangalore.


http://www.research.ibm.com/labs/india/

Guys I am working here since 2012 and let me tell you its great place to work. Awesome opportunity !!

To apply share your latest resume with me by mail it on viveksharma.career@gmail.com, Please write a comment below once you have shared your resume.

Post Graduates preferred !!

Thursday, January 17, 2013

Integration of FacebookSDK into iOS 5.x & iOS 6.x

Hey Guys,

Sorry for being away from a very long time, Someone asked me about the new Facebook API integration (Common Integration) for iOS 5.0 & iOS 6.0 all together, So posting this tutorial, hope it will help.

The Facebook SDK for iOS is designed to be easy to install and use. This guide walks you through the basics of setting up the development and project environment and creating a simple app.
Watch the screencast or follow the steps below.

1. Download the Facebook SDK.

Download it from here.


2. Create a Facebook App

You will need a Facebook App ID before you create a new project with the SDK.

Create a new app on the Facebook App Dashboard, enter your app's basic information.


Once created, note the app ID shown at the top of the dashboard page.


Alternatively, you can of course use the ID of an existing app.
Now, you need to set the Bundle Identifier and configure your Facebook application to support login from an iOS application.
(Note: this is a new step in the Facebook SDK for iOS v3.1. Previous versions of the SDK did not require this step.)
Click on the checkmark next to “Native iOS App” and supply your Bundle Identifier in the “Bundle ID” field. In addition, make sure the Facebook Login radio button is set to “Enabled”.


You can find or set your Bundle Identifier in Xcode in the Project tab.


3. Configure a new Xcode Project

Create a new Xcode project, add the Facebook SDK for iOS, its dependencies, and the Facebook App ID to its settings

In Xcode, create a new project, and select 'Single View Application' as shown below.


Provide a name and identifier as required:


Adding SDK, framework dependencies

Add the Facebook SDK for iOS Framework by dragging the FacebookSDK.framework folder from the SDK installation folder into the Frameworks section of your Project Navigator.


Choose 'Create groups for any added folders' and deselect 'Copy items into destination group's folder (if needed)' to keep the reference to the SDK installation folder, rather than creating a copy.


Add the Facebook SDK for iOS resource bundle by dragging the FacebookSDKResources.bundle file from the FacebookSDK.framework/Resources folder into the Frameworks section of your Project Navigator.


As you did when copying the Framework, choose 'Create groups for any added folders' and deselect 'Copy items into destination group's folder (if needed)'

You can also add the FBUserSettingsViewResources bundle in the same way if you expect to use that controller in your app.

The SDK relies on three other frameworks (AdSupport, Accounts and Social) to use the Facebook features built into iOS6. To add these, go to the 'Linked Frameworks and Libraries' section of the target's Summary pane, and click the 'plus' button to add them:


Note: You should use the 'Optional' flag for iOS6-specific frameworks if you would like your app to also build for older versions of the operating systems.


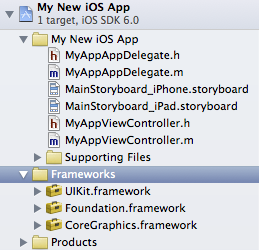
Once done, your Project Navigator should look something like this:


Adding SQLite

Next you need to add the ''-lsqlite3.0'' SQL library to the list of build dependencies in the Build Settings pane:


Adding your Facebook App ID

Finally, you need to place the Facebook app ID in two places in your application's main .plist file. Create a key called FacebookAppID with a string value, and add the app ID there:


Also, create an array key called URL types with a single array sub-item called URL Schemes. Give this a single item with your app ID prefixed with fb:


(This is used to ensure the application will receive the callback URL of the web-based OAuth flow.)


4. Start Coding !!

Get started by developing your own code or working through the Vivek's FB Sample App Code.


Will wait for your comments.....


(Courtesy: Facebook Dev)

Friday, March 18, 2011

Use of Protocols to create and work on own delegates

Delegates are very useful to control transfer within the array of view controllers in app manually. Using delegates you can manage the control flow very well.

here is small example of own delegates....

1. Create a protocol class.... (.h only)


SampleDelegate.h


#import


@protocol SampleDelegate
@optional

#pragma Home Delegate

-(NSString *)getViewName;

@end


2. Import above protocol class in the class whom you want to make delegate of another class. Here in my ex. I m using AppDelegate to make delegate of The HomeViewController's Object.

also add above DelegateName in Delegate Reference < >


ownDelegateAppDelegate.h

#import "SampleDelegate.h"

@interface ownDelegateAppDelegate : NSObject <UIApplicationDelegate, SampleDelegate> {

}


ownDelegateAppDelegate.m

//setDelegate of the HomeViewController's object as
[homeViewControllerObject setDelegate:self];

//add this delegate method definition
-(NSString *)getViewName
{
    return @"Delegate Called";
}


HomeViewController.h

#import
#import "SampleDelegate.h"

@interface HomeViewController : UIViewController {
    
    id<SampleDelegate>delegate;
}

@property(readwrite , assign) id<SampleDelegate>delegate;

@end


HomeViewController.h

- (void)viewDidAppear:(BOOL)animated {
    
    [super viewDidAppear:animated];
    
    
    UILabel *lblTitle = [[UILabel alloc] initWithFrame:[[UIScreen mainScreen] bounds]];
    lblTitle.text = [delegate getViewName];
    lblTitle.textAlignment = UITextAlignmentCenter;
    [self.view addSubview:lblTitle];
}


 or download above source code from here.


Thursday, March 10, 2011

Update your MAC Softwares


Hey guys its time to update your MACs….. Update it with all new... 


1.Mac OS X v10.6.6 Update Combo

To download click here


3. xCode 4 (new with some great modifications, please note you have to pay $4.99 for that and if you have $99 account then its FREE for YOU.)

To download click here


3. iOS SDK 4.3

To download click here


4. iTunes 10.2.1

To download click here


4. iOS 4.3 Software Update


To download click here


5. Safari 5.0.4

To download click here


Happy Coding...!!! :)

Vivek Sharma
Bangalore, India

Monday, January 31, 2011

Table Cell Examination Animation

Hey guys this is great animation help for the developers who want to have animation in UItableView Cell as expantion of cell....


for that u can download this code from here.

Tuesday, December 28, 2010

Circular Picker View

Hi to all iPhone Players, Some time while working on Picker View Controller may be you faced a issues of  limited picker view display, means your picker view wheel is not moving continuously, its stoping on the last Value. but you want it to move circularly with the same values.

here is a Solution to get the same effect :

just manipulate your picker view delegate methods like this...


- (NSString *)pickerView:(UIPickerView *)pickerView titleForRow:(NSUInteger)row forComponent:(NSUInteger)component; {
NSMutableArray *strings = [NSMutableArray arrayWithCapacity:10];
[strings addObject:@"Zero"];
[strings addObject:@"One"];
[strings addObject:@"Two"];
[strings addObject:@"Three"];
[strings addObject:@"Four"];
[strings addObject:@"Five"];
[strings addObject:@"Six"];
[strings addObject:@"Seven"];
[strings addObject:@"Eight"];
[strings addObject:@"Nine"];
return [strings objectAtIndex:(row%10)];
}


- (void)pickerView:(UIPickerView *)pickerView didSelectRow:(NSUInteger)row inComponent:(NSUInteger)component {
[self pickerViewLoaded:nil];
}

- (NSUInteger)pickerView:(UIPickerView *)pickerView numberOfRowsInComponent:(NSUInteger)component {
return 16384;
}


-(void)pickerViewLoaded: (id)blah {
NSUInteger max = 16384;
NSUInteger base10 = (max/2)-(max/2)%10;
[myPickerView selectRow:[myPickerView selectedRowInComponent:0]%10+base10 inComponent:0 animated:false];
}


- (NSUInteger)numberOfComponentsInPickerView:(UIPickerView *)pickerView {
return 1;
}


to get the Source Code, click here.

Friday, October 22, 2010

How to draw a graph (pie chart) using iPhone SDK

There are two ways:
1. by using google API for charts

    In this you just have to pass value through URL and google will return you a Graph Image, Then you can use it easily.


2. Another way is to use Graphics Methods

    I have an example for the same....

get it frm HERE.

Wednesday, October 6, 2010

iPhone FBConnect: Facebook Connect Tutorial


UPDATE: Please have a look to the updated post here...

http://viksiphoneblog.blogspot.in/2013/01/integration-of-facebooksdk-into-ios-50.html


By following these steps you can easily integrate with Facebook using FBConnect...

Create a Viewbased Application with name ‘FacebookAPI’.

before that:

1.Download Facebook Connect for iPhone SDK (http://svn.facebook.com/svnroot/platform/clients/packages/fbconnect-iphone.zip) or you can download same from here

Just go through the project. In particular, the “Connect” sample project. Sample Project gives demo of some of the functionality.

1.1.Open src/FBConnect.xcodeproj from SDK that you downloaded, and your own project as well.

1.2.Drag n drop FBConnect group. Make sure “Copy items into destination group folder” is NOT checked. It should look as shown below

1.3.Go to Project Menu ->Edit project settings and scroll down to “User Header Search Path” add entry which will point to “src folder”

1.4.To test import all .m n .h files in case any miss. And compile.

2.Login to Facebook. After that go to Developers Page (http://www.facebook.com/developers/) as shown below.

3.Register your application with Facebook

3.1.Click on Set up New Application Button in the upper right hand corner.

3.2.Give Application name and click on create application button. Then you will see new application screen with detail including “API key”and “API Secret Key”

Note : This application will not work until you provide your Facebook application’s API keys.

Now to get started with actual coding:

Append Following code in FacebookAPIAppDelegate.h

  #import
#import "FBConnect/FBConnect.h"
#import "FBConnect/FBSession.h"

@class FacebookAPIViewController;

@interface FacebookAPIAppDelegate : NSObject {
UIWindow *window;
FacebookAPIViewController *viewController;
FBSession *_session;
}

@property (nonatomic, retain) IBOutlet UIWindow *window;
@property (nonatomic, retain) IBOutlet
FacebookAPIViewController *viewController;
@property (nonatomic,retain) FBSession *_session;
@end


Append Following code in FacebookAPIAppDelegate.m


 #import "FacebookAPIAppDelegate.h"
#import "FacebookAPIViewController.h"

@implementation FacebookAPIAppDelegate

@synthesize window;
@synthesize viewController;
@synthesize _session;

- (void)applicationDidFinishLaunching:(UIApplication *)application {
// Override point for customization after app launch
[window addSubview:viewController.view];
[window makeKeyAndVisible];
}

- (void)dealloc {
[_session release];
[viewController release];
[window release];
[super dealloc];
}

@end

Here in FacebookAPIAppDelegate we have just declared _session variable of type FBSession to keep track of the session and to check if session for current user exists or not.

Append Following code in FacebookAPIViewController.h


#import  
#import "FBConnect/FBConnect.h"
#import "FBConnect/FBSession.h"

@interface FacebookAPIViewController : UIViewController {
FBLoginButton *loginButton;
UIAlertView *facebookAlert;
FBSession *usersession;
NSString *username;
BOOL post;
}

@property(nonatomic,retain) FBLoginButton *loginButton;
@property(nonatomic,retain) UIAlertView *facebookAlert;
@property(nonatomic,retain) FBSession *usersession;
@property(nonatomic,retain) NSString *username;
@property(nonatomic,assign) BOOL post;

- (BOOL)textFieldShouldReturn:(UITextField *)textField;
-(void)getFacebookName;
-(void)postToWall;

@end


Append Following code in FacebookAPIViewController.m

  #import "FacebookAPIViewController.h"
#import "FacebookAPIAppDelegate.h"

#define _APP_KEY @"Your API Key Goes here"
#define _SECRET_KEY @"Your Secrete Key Goes here"

@implementation FacebookAPIViewController
@synthesize loginButton;
@synthesize facebookAlert;
@synthesize usersession;
@synthesize username;
@synthesize post;

- (void)viewDidLoad {
FacebookAPIAppDelegate *appDelegate =
(FacebookAPIAppDelegate *) [[UIApplication
sharedApplication]delegate];
if (appDelegate._session == nil){
appDelegate._session = [FBSession
sessionForApplication:_APP_KEY
secret:_SECRET_KEY delegate:self];
}
if(self.loginButton == NULL)
self.loginButton = [[[FBLoginButton alloc] init] autorelease];
loginButton.frame = CGRectMake(0, 0, 100, 50);
[self.view addSubview:loginButton];
[super viewDidLoad];
}

- (void)dealloc {
[username release];
[usersession release];
[loginButton release];
[super dealloc];
}

- (void)session:(FBSession*)session didLogin:(FBUID)uid {
self.usersession =session;
NSLog(@"User with id %lld logged in.", uid);
[self getFacebookName];
}

- (void)getFacebookName {
NSString* fql = [NSString stringWithFormat:
@"select uid,name from user where uid == %lld",
self.usersession.uid];
NSDictionary* params =
[NSDictionary dictionaryWithObject:fql
forKey:@"query"];
[[FBRequest requestWithDelegate:self]
call:@"facebook.fql.query" params:params];
self.post=YES;
}

- (void)request:(FBRequest*)request didLoad:(id)result {
if ([request.method isEqualToString:@"facebook.fql.query"]) {
NSArray* users = result;
NSDictionary* user = [users objectAtIndex:0];
NSString* name = [user objectForKey:@"name"];
self.username = name;
if (self.post) {
[self postToWall];
self.post = NO;
}
}
}

- (void)postToWall {
FBStreamDialog *dialog = [[[FBStreamDialog alloc] init]
  autorelease];
dialog.userMessagePrompt = @"Enter your message:";
dialog.attachment = [NSString
stringWithFormat:@"{\"name\":\"Facebook Connect for
iPhone\",\"href\":\"http://developers.facebook.com/
connect.phptab=iphone\",\"caption\":\"Caption\",
\"description\":\"Description\",\"media\":[{\"type\":
\"image\",\"src\":\"http://img40.yfrog.com/img40/
5914/iphoneconnectbtn.jpg\",\"href\":
\"http://developers.facebook.com/connect.php?
tab=iphone/\"}],\"properties\":{\"another link\":
{\"text\":\"Facebook home page\",\"href\":
\"http://www.facebook.com\"}}}"];
[dialog show];
}

- (BOOL)textFieldShouldReturn:(UITextField *)textField
{
[textField resignFirstResponder];
return YES;
}

@end

Define API key and Secret key with the keys you received while registering your app on facebook.


#define _APP_KEY @"put your app key over here"
#define _SECRET_KEY @"put your secret key over here"

Validate session variable in ViewDidLoad. If it doesn’t exist then create the same for using API key and Secret key. For that, one needs to conform the protocol FBSessionDelegate in respective header file. Also create a login button using FBLoginButton.

While implementing protocol FBSessionDelegate one needs to implement following mandatory method
view source
print?

-(void)session:(FBSession*)session didLogin:(FBUID)uid

This methos is automatically called when user is logged in using FBConnect SDK.
In this method we get session for that user and it’s uid which unique identifier for that user.

Once FBSession session is avaiable, we can accesss all the APIs provided by Facebook.
For now, we will see how to post user name and status on the facebook wall.

To get Facebook username a request is send in which select query is written to get username using uid.

  NSString* fql = [NSString stringWithFormat:
@"select uid,name from user where uid == %lld", self.usersession.uid];
NSDictionary* params = [NSDictionary dictionaryWithObject:fql forKey:@"query"];
[[FBRequest requestWithDelegate:self] call:@"facebook.fql.query" params:params];

Override following FBRequestDelegate method to check the reponse of above query.


-(void)request:(FBRequest*)request didLoad:(id)result

The argument result is an array of NSDictionary Objects which contains info for that user as key-value pairs. Retrieve it as follows:

  NSArray* users = result;
NSDictionary* user = [users objectAtIndex:0];
NSString* name = [user objectForKey:@"name"];

Use FBStreamDialog class post message on the facbook wall. A dialog pops up with a message box to post on Wall.


FBStreamDialog *dialog = [[[FBStreamDialog alloc] init] autorelease];
dialog.userMessagePrompt = @"Enter your message:";
dialog.attachment = [NSString stringWithFormat:@"{\"name\":\"Facebook Connect for iPhone\",\"href\":\"http://developers.facebook.com/connect.php?tab=iphone\",\"caption\":\"Caption\",\"description\":\"Description\",\"media\":[{\"type\":\"image\",\"src\":\"http://img40.yfrog.com/img40/5914/iphoneconnectbtn.jpg\",\"href\":\"http://developers.facebook.com/connect.php?tab=iphone/\"}],\"properties\":{\"another link\":{\"text\":\"Facebook home page\",\"href\":\"http://www.facebook.com\"}}}"];
[dialog show];

Now Save project (Command +S). Build and Run Project.

Simulator will look like as follows


 Click on Fconnect Button and Facebook Login Dialog will appear.


Login with your user name and Password . Wait for untill post to Wall Dialog pops up


You can download the source code from here. I hope this will help u in a better way.

NOTE: Some contents of this post are fetched from some other web sources.
Sunday, October 3, 2010

UIActivityIndicator in status bar

spinner status bar To display a UIActivityIndicator use the UIApplication’s property: networkActivityIndicatorVisible.

    [UIApplication sharedApplication].networkActivityIndicatorVisible = YES;

and to disable:

    [UIApplication sharedApplication].networkActivityIndicatorVisible = NO;

That’s almost all about UIActivityIndicator. More can be found in UIActivityIndicator Class Reference in documentation.

Thursday, September 30, 2010

How to expand cell of a Table View with animation... :)

here is how i am managing this

1. you need an NSMutableArray

the NSMutablearray is the same count as the datasource array for the table

so, you need to populate it with something like this

Code:

self.cellAccessArray = [[NSMutableArray alloc] initWithObjects:@"closed",@"closed",@"closed",@"closed",nil];
[self.cellAccessArray release];

this means we have 4 table rows

now, in your heightForRowAtIndexPath, put this

Code:

if([[self.cellAccessArray object atIndex:indexPath.row] isEqualToString:@"open"])
{
return 140;
}
return 70;

now, to the didSelectRowAtIndexPath

put this


Code:

if([[self.cellAccessArray objectAtIndex:indexPath.row] isEqualToString:@"closed"])
{
[self.cellAccesArray replaceObjectAtIndex:indexPath.row withObject:@"open"];
}
else
{
[self.cellAccesArray replaceObjectAtIndex:indexPath.row withObject:@"closed"];
}

[tableView reloadRowsAtIndexPath:[NSArray arrayWithObject:indexPath] withRowAnimation:UITableViewRowAnimationNone];


If you want a more Attractive way to do this then click here.

Friday, September 24, 2010

Methods for CUT, COPY n PASTE in any iPhone App.

-(IBAction)cut {
  [self copy];
  textPad.text = @"";
} 
 
-(IBAction)copy {

        NSString *copyString = [[NSString alloc] initWithFormat:@"%@",[textPad text]];
        UIPasteboard *pb = [UIPasteboard generalPasteboard];
        [pb setString:copyString];
}

-(IBAction)paste {
        UIPasteboard *pb = [UIPasteboard generalPasteboard];
        textPad.text = [pb string];
} 

Monday, September 20, 2010

My Camera

This is an App which is useful when u need to develop a Camera App which provides the facility to user to edit image size and crop using a Square Box. To get Source Code click here.

My Compaas

This is an iPhone App which describe the working of Compass in 3gs n upgraded iphones. to download the Source Code click here.

Friday, September 3, 2010

How to create own delegates..... (Protocol methods)

if u want to update any variable or call any method of any class for Eg. Class A). of your project while the control is working in any other class(for Eg. Class B), then you can do it by creating your own delegate/protocol in calling class, and Declare that method in that protocol n define that method in called class.... to elaborate lets see the code.....


Calling.h //First Class

@protocol myDelegate [NSObject]
@optional
- (void) doIt;
@end

@interface Calling :
UIViewController {

id [
myDelegate] delegate;
}

@property(nonatomic, retain) id
[myDelegate] delegate;

@end


Calling.m

#import " Calling.h"

#import " Called.h "

@implementation Calling

@synthesize delegate;

- (void)viewDidLoad {
[super viewDidLoad];

[delegate hideUnhideMenu];
}

@end


Called.h // Class B

@interface Called : UIViewController
[myDelegate] {

}

@end


Called.m

#import " Called.h"

@implementation Called

- (void)viewDidLoad {
[super viewDidLoad];

Calling* obj = [[Calling alloc] init];
obj.delegate = self;
}

- (void)hideUnhideMenu {

//Do your updation here.
}

@end


NOTE: please replace "[" type of brackets with "<". 


for more details about this post click here

Delegate methods to delete rows from a table view.

- (UITableViewCellEditingStyle)tableView:(UITableView *)aTableView editingStyleForRowAtIndexPath:(NSIndexPath *)indexPath {
return UITableViewCellEditingStyleDelete;
}

- (void)setEditing:(BOOL)editing animated:(BOOL)animated {
// Updates the appearance of the Edit|Done button as necessary.

[super setEditing:editing animated:animated];
[tblName setEditing:editing animated:animated];
}

- (void)tableView:(UITableView *)tableView commitEditingStyle:(UITableViewCellEditingStyle)editingStyle forRowAtIndexPath:(NSIndexPath *)indexPath {
[tableView beginUpdates];
if (editingStyle == UITableViewCellEditingStyleDelete) {
// Do whatever data deletion you need to do...
// Delete the row from the data source
//[arrItems removeObjectAtIndex:indexPath.row];
[tableView deleteRowsAtIndexPaths:[NSArray arrayWithObjects:indexPath, nil] withRowAnimation:YES];
}
[tableView endUpdates];
}

Add Discloserbutton in tableview n do sumthing on click

- (UITableViewCellAccessoryType)tableView:(UITableView *)tableView accessoryTypeForRowWithIndexPath:(NSIndexPath *)indexPath
{
return UIButtonTypeDetailDisclosure;
}

- (void)tableView:(UITableView *)tableView accessoryButtonTappedForRowWithIndexPath:(NSIndexPath *)indexPath
{
//Do what you want here.
}

Monday, August 30, 2010

How to customize Alert View

Customize Alert View like...

1. Changing background color of a alert view...
2. Change in Alert View Buttons.. etc.

UIAlertView *theAlert = [[[UIAlertView alloc] initWithTitle:@"My Alert"
message: nil delegate:self cancelButtonTitle:@"Cancel"
otherButtonTitles:@"Button1", @"Button2", @"Button3", nil] autorelease];
[theAlert show];

//Set View of Button Cancel at index 1 in AlertView.
[[[theAlert subviews] objectAtIndex:1] setBackgroundColor:[UIColor colorWithPatternImage:[UIImage imageNamed:@"btnCancelBG.png"]]];
[[[theAlert subviews] objectAtIndex:1] setShadowColor:[UIColor clearColor]];

//Set View of Button at index 2 in AlertView.
[[[theAlert subviews] objectAtIndex:2] setBackgroundColor:[UIColor colorWithPatternImage:[UIImage imageNamed:@"button1.png"]]];
[[[theAlert subviews] objectAtIndex:2] setShadowColor:[UIColor clearColor]];
[[[theAlert subviews] objectAtIndex:2] setTitleColor:[UIColor grayColor] forState:UIControlStateNormal];

//Set View of Button at index 3 in AlertView.
[[[theAlert subviews] objectAtIndex:3] setBackgroundColor:[UIColor colorWithPatternImage:[UIImage imageNamed:@"button2.png"]]];
[[[theAlert subviews] objectAtIndex:3] setShadowColor:[UIColor clearColor]];
[[[theAlert subviews] objectAtIndex:3] setTitleColor:[UIColor grayColor] forState:UIControlStateNormal];

//Set View of Button at index 4 in AlertView.
[[[theAlert subviews] objectAtIndex:4] setBackgroundColor:[UIColor colorWithPatternImage:[UIImage imageNamed:@"button3.png"]]];
[[[theAlert subviews] objectAtIndex:4] setShadowColor:[UIColor clearColor]];
[[[theAlert subviews] objectAtIndex:4] setTitleColor:[UIColor grayColor] forState:UIControlStateNormal];

UILabel *theTitle = [theAlert valueForKey:@"_titleLabel"];
[theTitle setFont:[UIFont fontWithName:@"Helvetica" size:16]];
[theTitle setTextAlignment:UITextAlignmentLeft];

UIImage *theImage = [UIImage imageNamed:@"alertBG.png"];
CGSize theSize = [theAlert frame].size;

UIGraphicsBeginImageContext(theSize);
[theImage drawInRect:CGRectMake(0, 0, theSize.width, theSize.height)];
theImage = UIGraphicsGetImageFromCurrentImageContext();
UIGraphicsEndImageContext();

[[theAlert layer] setContents:[theImage CGImage]];


to get a running Sample Code Click here...

Sunday, August 29, 2010

To find any object in a view

here I am searching for a button in a AlertView.


for (UIView *v in [myAlertView subviews]) {
if ([v isKindOfClass:[UIButton class]]) {
//IF I AM THE RIGHT BUTTON
[v addSubview:myUIImageView];
}
}

Animation: Move an object

Show something moving across the screen. Note: this type of animation is "fire and forget" -- you cannot obtain any information about the objects during animation (such as current position). If you need this information, you will want to animate manually using a Timer and adjusting the x&y coordinates as necessary.


CABasicAnimation *theAnimation; theAnimation=[CABasicAnimation animationWithKeyPath:@"transform.translation.x"]; theAnimation.duration=1; theAnimation.repeatCount=2; theAnimation.autoreverses=YES; theAnimation.fromValue=[NSNumber numberWithFloat:0]; theAnimation.toValue=[NSNumber numberWithFloat:-60]; [view.layer addAnimation:theAnimation forKey:@"animateLayer"];